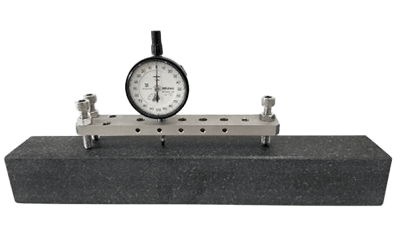
What Is a Flatness Tester?

A flatness tester is a measuring instrument mainly used to evaluate the degree of flatness of a machined surface.
Even processed surfaces that appear to be flat generally have very slight unevenness or undulation. This slight unevenness or undulation may affect the functionality of industrial products.
Flatness testers are necessary to guarantee the functionality of a product by evaluating the degree of flatness. There are three main methods of measuring flatness. There are three main methods of measuring flatness: using a dial gauge, which is a general-purpose measuring instrument; using a reference standard; and using a laser beam.
Uses of Flatness Testers
Flatness testers are mainly used to evaluate the flatness and flatness of industrial metal products. For example, when a casing part of a machine that must be airtight consists of multiple parts, there is always a “mating surface” where the parts are combined.
If the mating surfaces do not have a certain level of flatness, airtightness cannot be ensured. Flatness Testers are used to evaluate the flatness of these mating surfaces. Examples include engines and automotive transmissions. It is important to ensure the flatness of the mating surfaces of casing parts of machines that contain oil inside.
Other applications include special prisms for optics. Prisms are glass instruments that refract or reflect light and are used in cameras, etc. If the optical transmission glass surface is not perfectly flat, light cannot be refracted or reflected properly, so it is necessary to check the flatness.
Principle of Flatness Testers
There are three main methods of measuring flatness:
1. Measurement Using a Dial Gauge
Flatness measurement using a dial gauge is a method that is relatively easy to apply to the measurement of various parts. First, a dial gauge is not a dedicated Flatness Tester, but a general-purpose measuring instrument that reads the amount of movement by direct contact with a step or other distance in one direction.
The dial gauge and the part for which flatness is to be measured are placed on a surface plate or other reference plane, and the height of multiple points is measured. Although it is relatively easy to measure, the evaluation results can be affected if the surface plate is not flat or if the product to be measured is tilted.
It is important to note that the results will vary depending on the number of points to be evaluated as well as the area to be evaluated as widely as possible.
2. Measurement Using a Flatness Reference Standard
The flatness reference standard is a standard that guarantees flatness. The flatness is evaluated by placing the object to be measured in contact with the flatness reference standard, irradiating light onto the contact area, and measuring the light that leaks from the gap between the two objects.
3. Measurement by Laser Beam
Most of the products sold as flatness measurement devices use laser beams. These devices measure flatness by irradiating a laser beam onto an object and measuring the reflection.
The advantages are that they do not damage the surface and the measurement is instantaneous, but they require more expensive measuring equipment than the other two methods.
Other Information on Flatness Tester
1. About Flatness
Ensuring that good flatness touches each other is very important for the function of the product, e.g., in airtightness and wear resistance. In some cases, it may also affect appearance quality.
Flatness can be defined as “the amount of deviation from the geometrically correct plane of a planform.” Simply put, it is the distance between the most convex and most concave parts of a surface when sandwiched between two ideal planes. Also, flatness does not have to be specified only for flat surfaces; it can be specified even for curved surfaces.
For cylinders and bores, concentricity and co-axiality must also be specified. Appropriate geometric tolerances must be selected according to the application and purpose.
2. Points to Keep In Mind When Measuring Flatness
When measuring flatness, attention must be paid to singularities such as scratches, dust, and protrusions on the surface to be evaluated. In some cases, they must be removed.
If the singularity cannot be completely removed, the displacement should be obtained at a position where the measurement point is slightly displaced. If the flatness is obtained without removing the singularity, the value will be much worse than the original value.
Furthermore, it is important to determine whether the value obtained by removing singularities is affected by warpage of the product or not.