カテゴリー
category_usa

Belt Sander

What Is a Belt Sander?

Belt Sanders

A Belt Sander is a power tool that grinds objects by rotating a sanding belt between two rollers at high speed.

It is suited for work that requires strong sanding power, such as rust removal, paint removal, and rough scraping of wood, metal, and other surfaces.

There is a flat metal base on the bottom, and a belt moves across the surface. By pressing the belt against the object, the object is sanded.

Uses of Belt Sanders

Belt Sanders are used in DIY and other applications to process a variety of materials. Specifically, they are used for chamfering and polishing wood, smoothing surfaces, shaving corners, deburring metal, and polishing surfaces.

Due to its high abrasive power, it is not suitable for finish sanding. The key to a good final product is to use a belt sander for materials with poor surface conditions, sand rough surfaces, and then use a random or orbital sander for finish sanding.

In addition to DIY, belt sanders are also used by carpenters, metalworkers, and auto body shops.

Principle of Belt Sanders

The principle of belt sanders is that a sanding belt rotating at high speed is applied to the surface of the object to be sanded by scraping the surface of the object. The amount of sanding and surface roughness can be adjusted according to the coarseness of the belt.

Types of Belt Sanders

There are four types of belt sander to choose from The type used by holding the main unit includes the up-handle type, the square type, and the narrow type with a thin belt, which grinds by pushing the operating belt against a fixed object.

There is also the stationary type, in which the main body of the belt sander is fixed and the object is ground by placing it against the rotating belt.
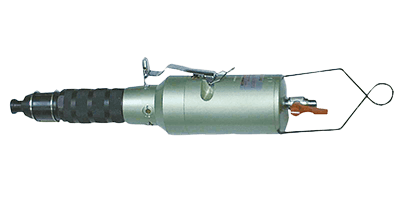
1. Up-Handle Type

This type of sander is specialized for hand-held work. The up-handle type can be used to efficiently polish furniture tops and large floor surfaces. 

2. Square Type

It is used by holding the main body by hand and features grips on the front and back of the main body. Thereby, the square type can be used like a stationary type with the sanding belt on the top surface. It can efficiently sand and finish small materials. 
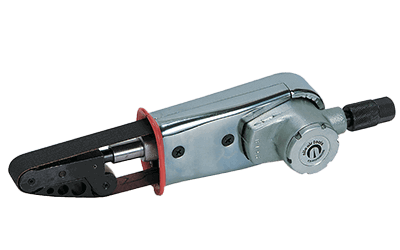
3. Narrow Type

The narrow belt is characterized by its narrow width. The narrow type is suitable for sanding narrow and complex-shaped objects.

4.Stationary Type

Compared to other types, the main body of this type is larger, which allows for a wider polishing range. By manually placing the object against the rotating belt, detailed forming processes such as corner removal can be performed efficiently.

How to Select a Belt Sander

The following points should be considered when selecting a belt sander:

1. Power Consumption

The appropriate motor power depends on the object to be sanded. A belt sander with a higher power consumption (W) is a more powerful motor. If you are sanding a large area or a hard material, you should select a belt sander with a higher power consumption. 

2. Belt Width and Length

Belt width and length should be selected according to the size of the material to be sanded. For small materials, a narrower width is acceptable, but when sanding large materials, a wider width and longer length will improve work efficiency.

The most common belt widths are 76 mm or 100 mm. Narrower models have a belt width of 30 mm or less.

3. Other

Some belt sanders may have various functions such as adjustable sanding speed, dust suction function, dustproof performance, and so on.

It is better to select the function that suits your work. For woodworking, a dust collection function improves work efficiency because it reduces the need for cleaning after use.

Other Information on Belt Sanders

How to Use a Belt Sander

The following is an explanation of how to use an up-handle type or other type of belt sander that is used for sanding by holding the belt sander itself.

  1. Turn on the power while the belt is separated from the object, and rotate the belt until it stabilizes.
  2. When the belt slowly makes contact with the object, the belt will sand the object.
  3. The weight of the main unit itself is sufficient to grind the object, so pressing force is not necessary.
  4. The rotation of the belt applies a forward force to the main unit, so the hand holding the unit should be lightly applied in the opposite direction.

The speed of belt sanders is adjustable. Rough grinding and paint peeling are performed at high speed, and when surface finish is important, sanding is performed at low speed. Sanding belts are selected based on the surface roughness after sanding and the size of the body.

The larger the belt number, the finer the surface finish. Belt sizes for general processing are as follows:

  • #60: Roughing of wood, peeling of paint
  • #80 and up: Polishing of non-metals
  • #150 and up: Finishing wood
カテゴリー
category_usa

Chainsaw

What Is a Chainsaw?

Chain SawsA Chainsaw is a two-handed machine used primarily for cutting wood. Its main use is to cut objects to a suitable size.

Chainsaw blades are strung together like a chain (saw chain), with sharp blades on the outside of the loop. The blades rotate at high speed, cutting objects more efficiently than with tools such as handsaws.

Anyone can use a chainsaw, but a bare blade can be very dangerous. Safety precautions should be taken when using a chainsaw.

Uses of Chainsaws

Chainsaws are used for DIY purposes, such as cutting wood, pruning garden branches, and making firewood. In the professional field, they are often used in forestry, lumbering, landscaping, agriculture, and civil engineering-related work.

Tools used for cutting wood include saws, axes, and hatchets, but they are manually operated and are very time-consuming. Chainsaws, on the other hand, are machines that rotate their blades at high speed, making it much easier to cut wood, and they can cut a large number of trees in a short period of time.

Principle of Chainsaws

A chainsaw cuts wood by rotating its blades at high speed. The main body, which contains the power source, has a long, thin plate called a guide bar, and a chain (saw chain) is wound around the guide bar. The chain is rotated at high speed to cut the wood as if it is being shaved.

There are engine-powered, rechargeable, and power-supply powered saws, each with different power and ease of use. Because the blade is exposed and rotates at high speed, it can be very dangerous if used or selected incorrectly.

How to Select a Chainsaw

Chainsaw selection is based on the purpose of the work and the working environment. Choosing the right one for the purpose will lead to improved work efficiency and safety.

When selecting a chainsaw, the following points should be taken into consideration:

1. Power Source

Engine type
The engine is powered by fuel. The fuel is a mixture of gasoline and engine oil. Powerful and speedy cutting is possible. Since there is no power cord, it can be used anywhere and can work for a long time by refueling. However, the engine is heavy, which is a disadvantage.

Rechargeable
Powered by a rechargeable battery. Since there is no power cord, it can be used anywhere. It is lighter than the engine type and easy to handle with low vibration and noise, but it is inferior to the engine type in terms of power. Cannot be used when the battery charge runs out.

Power-supply type
Power is supplied via a power cord. There is no need to worry about the power source running out, but the location of use is limited. Since there is no battery or engine, it is lighter in weight compared to other products in the same class. Power is inferior to that of an engine type. 

2. Displacement and Voltage

Check the displacement for engine type and the voltage for rechargeable type. Decide according to the size of the object. Displacement and voltage are proportional to the length of the guide bar. The larger the displacement and voltage, the stronger the cutting force and the larger the size of the object to be cut. 

3. Types and Specifications of Guide Bars

A Guide bar is the part that supports the chain that wraps around and rotates the chain. By selecting a guide bar one size longer than the size of the wood to be cut, the load is reduced and safe cutting is possible.

The shape of the guide bar should be selected in consideration of the application and function.

Sprocket nose bar
By rotating the chain with a gear called a sprocket, the chain can cut at high speed, but the durability of the guide bar is low. This is the most common type and can be used for almost all applications.

Carving bar
The tip of the carving bar is narrower, and instead of cutting at a slower speed, kickback is less likely to occur. Its light weight makes it suitable for detailed work such as pruning.

Hard nose bar
This is a highly durable guide bar. Cutting speed is slower due to the lack of sprockets. Suitable for felling large-diameter trees.

4. Type of Handle

Top handle type
This type grips the handle on the top of the main body and the sides. This type is used for lightweight type. Suitable for branching, etc.

Rear handle type
This type is used to grip the handle at the rear and side of the body. The space between the two hands is wider than that of the top handle, giving a sense of stability.

6. Professional Use and General DIY Use

Many manufacturers offer lineups for professional and DIY use. The differences are specifications and durability. Some manufacturers change the color of the body to make it easier to recognize.

Other Information on Chainsaws

1. How to Use a Chainsaw

To start an engine-powered chainsaw, place it on the ground. Hold the front handle with your left hand and step under the rear handle with your right foot. The right hand pulls the starter and transfers it to the rear handle as it starts.

Once the rotation is stabilized, the chainsaw is lifted with both hands. The object is then cut by pressing against the underside of the guide bar.

A chainsaw is a very safety-conscious machine. If this is your first time working with a chainsaw, we recommend that you take a training course appropriate for the type of work you will be doing. 

2. Precautions When Using a Chainsaw

The following precautions should be taken when using a chainsaw:

  • Stop the engine before installing the saw chain.
  • The work environment must be prepared by checking that there are no objects or other workers that could cause an accident.
  • Always use the main unit with both hands.
  • If the upper side of the guide bar touches an object, the main unit will bounce back, causing kickback.
  • Keep hands and body away from the saw chain and guide bar during use.
  • After work, each part of the chainsaw should not be touched because it is hot.
カテゴリー
category_usa

Tapper

What Is a Tapper?

A tapper is a tool with a mechanism that grips and holds a tap for machining threaded holes in steel and other materials.

However, a wide range of tappers may also be referred to as tappers, including those intended to be attached to a machine tool for machining, hand drill-type tools that are turned by hand, and tools that use compressed air to rotate a tap attached to their tips. Although there are various names such as tapper and tap holder, all tappers have in common that there is an adapter to hold the tap.

How to Use Tappers

The following will explain how to use a tapper:

Fix the shank of the tap to the insertion slot of the tappers.

Common drill chuck fixing methods include keyed and unkeyed. With a keyed drill chuck, the chuck handle (chuck key) is inserted into the three side holes and rotated to open and close the chuck section. Insert the shank of the tap in the open position, and rotate the chuck handle to secure it so that it can be evenly chucked by the three jaws. With the keyless drill chuck, the chuck handle is not used, and the tap can be secured simply by rotating the ring after inserting the shank of the tap.

Once the tap is secured, lightly press the tappers so that the tip of the tap is straight at the position where the tap hole is to be drilled. Be careful not to press down more forcefully than necessary, as the screw hole may be crushed or the tap may be damaged.

How to Select Tappers

Regarding hand-held electric tappers, the following points should be taken into consideration when selecting one:

  • Tapping capacity
    Each tapper has a different thread hole size that can be processed. It is determined from the cutting torque and other factors assuming the machining of screw holes in carbon steel for machine structural use. Be sure to check whether the screw size you want to machine is compatible with the taper.

In the same way that taps themselves may require a change in material depending on the material to be processed, there are some models of tappers that do not recommend certain materials to be processed. If you plan to process special metals, it is recommended that you contact the manufacturer before purchasing.

  • Applicable Tap Shank Dimensions
    The shape of the shank part is important to fix a tap.
  • Rotation speed
    Check the cutting conditions and make sure that the tappers have acceptable rotation speed. The rotation speed can be calculated from the cutting speed and the tap shape. Compared to this, there is a certain amount of guideline for cutting speed depending on the work material. Slower cutting speeds are required for stainless steel than for aluminum, cast iron, and plastics.

It is important to note that stainless steel, in particular, will require a slower rotational speed. Some tappers have an adjustment mechanism for rotational speed, so if you are unsure, check to see if an adjustment mechanism is available.

  • Pre-hole machining or not
    While machining a screw hole typically requires the preparation of a pilot hole, it’s worth noting that some tappers may not support the machining of preparation holes. If a separate drill for preparing pilot holes cannot be made, it is important to assess whether the tapper can handle the preparation of pilot holes.
  • Necessity of electric power
    Before purchasing tappers, it is important to consider whether they need to be electrically powered. If the main purpose is to drill holes with threads up to M6 size, a tap drill set for manually drilling screw holes may be sufficient. Also, if you use it in a place where electricity is not available, of course, you cannot consider buying an electric tapper and another type would need to be considered.
カテゴリー
category_usa

Staple

What Is a Staple?

Staples are the needles of a stationery tool called a tacker.

Tackers are used in woodworking and construction and refer to large staple-like tools. Staples are used to secure objects such as fabric, thin wood, wire mesh, etc. in applications such as construction sites or furniture repair.

Staples are U-shaped like a staple needle and are connected with adhesive. The staple is bent to hold the object in place, whereas the staple is inserted without bending.

Uses of Staples

Staples are used in a wide range of applications, from general office work and DIY to professional work sites. They are often used as needles for a tool called a tacker, which is used to fasten thin materials such as paper and cloth.

Note that there are several types of tackers, including hand-operated gun tackers and hammer tackers, motorized electric tackers, air tackers, and floor tackers.

In construction, they are used for fixing insulation and tarps, in interior work for finishing interior materials, and in furniture production for reupholstering chairs.

Principle of Staples

The staple is U-shaped like a staple needle, and the tip of the needle is not bent, but pierced to fix the staple in place.

They are basically used by loading them into a tacker. Gun tackers and hammer tackers strike the staple by pushing the shoulder of the staple out from above. Electric tackers use voltage to drive the staple, while air tackers use air pressure to drive the staple.

The width of the staple is called shoulder width, the length of the leg is called leg length, and the width of the line when viewed from the front of the staple is called thickness and the width when viewed from the side is called width.

There are different types of staples in combination with shoulder width and leg length, and it is important to use the right staple for each application.

Types of Staples

1. Classification by Material

There are different types of staples such as galvanized, hard steel, stainless steel, aluminum, resin coated, plastic, and those with colors.

Stainless steel staples are rust-resistant, while resin-coated and plastic staples are used as insulating staples for high-frequency, electrical, and other insulating parts. 

2. Classification by Size

Staples are available in sizes ranging from 3mm to 22mm in shoulder width and from 3mm to 50mm in leg length.

3. Classification by Color

Some staples used for finishing materials are discreetly colored. 

4. Special Staples

There are staples for tatami mats, staples used to fix artificial turf, and staples for fur.

How to Select Staples

The important point in selecting staples is to consider the size, material, and color according to the type of tacker to be used and the purpose of use.

Select the shoulder width (width to secure the object) and leg length (depth to penetrate the object) according to the size and thickness of the material to be secured. Staples that are too small for the material should be used with caution, as they may jam.

If the staple is to be used in an area that is easily visible, choose a color staple that matches the object to be fastened so that the needle is less noticeable. Staples are available from the manufacturers of tackers.

Even though there is no difference in the size of each manufacturer’s staples, and even though they can be loaded and used, it is basically necessary to use the same manufacturer’s staples and tacker to prevent the needle from jamming in the tacker.

Other Information on Staples

1. How to Use a Tacker

  1. Staples are loaded into the magazine space on the tacker body.
  2. Always load the electric tacker with staples before plugging it in.
  3. Press the tacker firmly against the surface to be tackled.
  4. Pull the trigger to drive in the staple. If the staple is lifted by the recoil, it will not be driven in properly.

2. Staple Remover

This is a tool to remove staples. The principle of leverage makes it easy to remove staples. You can pull them out with pliers or nippers, but it is safer to use a staple remover because you may damage the material or break the legs.

カテゴリー
category_usa

Finishing Nail

What Is a Finishing Nail?

Finishing nails are nails that are used in sheets and loaded into a finishing nailer.

A finishing nail has heads, whereas pin nails, which are used for similar purposes, do not. Therefore, finishing nails are used where holding power is required, such as in ceiling finishing work.

There are two types of finishing nail head diameters: 1.9mm and 1.4mm, with the 1.4mm head referred to as a super finishing nail.

How to Use Finishing Nails

In preparation for nailing, finishing nails are loaded into the magazine of a finishing nailer. The nail is fired when the ejection port of the finishing nailer is pressed against the object and the trigger is pulled.

When using the nailer, please note the following points:

  • Protective eyewear must be worn as nails may rebound after being misfired.
  • The trigger must be locked and the air hose must be disconnected when loading nails to prevent accidental nail firing.
  • To prevent malfunction of the unit, nails specified by the manufacturer are recommended.

How to Select Finishing Nails

The key to selecting finishing nails is to consider the color, length, and diameter of the nail, taking into account the condition of the finish.

The head of the nail is coated with a color. This is done to make the nail less noticeable by matching it to the object to be hammered. The types of colors that can be selected are white, china, beige (light to dark), and light camel.

Nail lengths should be selected according to the thickness of the object. Nails are available in a wide range of lengths from 15mm to 55mm.

Finishing nails include super finishing nails with slightly smaller head diameters. If you want to make the finish condition less noticeable, you may want to consider super-finishing nails. Below are the head and shaft diameters of the nails:

  • Finishing nails: head diameter 1.9mm, shaft diameter 1.25mm to 1.3mm
  • Super finish nails: head diameter 1.4mm, shaft diameter 1.25mm to 1.3mm

Even if there is no numerical difference in dimensions, it is recommended that nails be made by the same manufacturer as the finish nailer.

カテゴリー
category_usa

Air Hammer

What Is an Air Hammer?

Air Hammers

An air hammer uses compressed air to reciprocate the piston of an air cinder built into the main body. It continuously strikes the end of a chisel with the piston, and the tip of the chisel is pressed against the target object to deliver impact.

It is a type of pneumatic tool that is compact, lightweight, and powerful and is used for many types of work, such as stripping and crushing.

There are two general types of air hammers: air chippers and air hammers, each of which is used for different purposes.

Uses of Air Hammers

Air hammers are used for various purposes depending on the type.

Air Chipper

a. Air hammer (air chipping hammer)
This is a general type of air hammer used for chipping metal, stone, concrete, etc. It is also used for tasks such as removing rust, crushing, cutting, and peeling wall surfaces, and sanding castings. By replacing the chisel, simple staking, riveting, and shaft driving can also be performed.

b. Air flux hammer (air chipper)
This is the smallest and lightest type and is used to remove welding spatters, scale, and slag, as well as deburring, paint, and rust removal.

Air Hatcher

Air Concrete Breaker
As the name suggests, these air hammers are used to break up concrete and other materials.

Others

Other types of air hammers include the following:

  • Diggers are used for concrete hacking and soil excavation.
  • Sand hammers are used for cementing refractory bricks and sanding castings.

How to Select Air Hammers

It is a prerequisite to select the right type of air hammers for the intended use, the work to be done, and the type of object to be covered.

Specifications

The following performance items are important in selecting air hammers and should be selected in consideration of the differences in objects and the power required for crushing.

Examples include piston diameter, piston stroke, number of blows per minute (unit: bpm (times/min), min-1), operating air pressure (MPa), and air consumption (liter/min, m3/min).

Chisel

It is necessary to confirm the type of chisel that can be used and the applicable shaft diameter and select a suitable chisel for the work and object.

The chisel inlet of the air hammer’s body can be either round or square. The round chisel rotates with the object, but the square chisel does not.

The following chisel tip shapes are available and used in various applications:

  • Flat chisels are used for tiling and scraping painted surfaces.
  • Sheet metal chisels are used for cutting thin sheets.
  • Point chisels are used for cutting concrete.
  • Rivet chisels are used for cutting rivets and removing welding spatters.
  • Scaling chisels remove concrete seepage from formwork and scrape off welding and residual materials.

Air Hose Connection Specifications

Air hose connections can be screwed on or dedicated couplers and plugs are used.

The main screw types used in the US are ASME/ANSI B 1.20.1 Tapered pipe threads.

カテゴリー
category_usa

Scaler

What Is a Scaler?

A scaler is a tool that can remove paint and rust by driving in a needle. It is often called a needle scaler or air needle scaler to distinguish it from a scaler used by dentists to remove tartar. Sometimes names such as air chisel or air needle chisel are also used.

Connected to a compressor, the needle is moved back and forth repeatedly to remove paint and rust.

Uses of Scalers

Scalers are tools that can peel off hard substances stuck to walls and other surfaces by quickly driving the needle into the surface.

It can be used not only to remove slag from welded walls and rust from metal surfaces such as steel plates, but also to roughen the surface of concrete, sandblast, and other materials.

It can also be used to strengthen welded areas by utilizing the pressure generated when the needle is driven in.

How to Select Scalers

Here are some points to consider when selecting scalers:

Shape

There are two types of scalers: pistol and straight.

  • Pistol-shaped scalers, as the name suggests, are shaped like a pistol and can peel in various directions.
  • Straight-shaped scalers are long and straight and can be inserted into deep or narrow places.

Number of Blows

The blow rate of scalers is expressed in bpm or rpm, which is the number of needles per minute. The straight type tends to have a higher blow rate than the pistol type.

Needle Specifications

There are various diameters and lengths of needles that can be used in different types of scalers. Therefore, it is necessary to select one according to the area of ​​the scalers to be used.

The most standard needles are 2mm in diameter x 180mm in length or 3mm in diameter x 180mm in length.

カテゴリー
category_usa

Pneumatic Drill

What Is a Pneumatic Drill?

A pneumatic drill is a drill that uses an air motor.

Similar to the pneumatic drill is the electric drill. Electric drills are driven by an electric motor, while pneumatic drills are driven by an air motor that uses compressed air.

Like electric drills, pneumatic drills can be used as screwdrivers for fastening screws or drilling holes by changing the end attachment of the rotating shaft.

However, they are not powerful enough to drill holes in concrete; for such tasks, hammer drills and vibration drills are more suitable.

Pneumatic drills are compact and powerful compared to electric drills. The main unit is also lightweight, making it accessible for individuals with limited strength who can use it with relatively little effort.

Uses of Pneumatic Drills

Pneumatic drills are used in industrial product manufacturing lines, auto repair shops, and construction sites.

Principle of Pneumatic Drills

Pneumatic drills are driven by an air motor. An air motor is a device that converts the power of compressed air produced by a compressor into the rotation of a rotating shaft.

There are two types of air motors: vane type and piston type. Vane-type air motors are usually used in pneumatic drills. Compressed air is guided to chambers separated by blades called vanes built into the rotor, and the compressed air pushes the vanes to drive the rotating shaft.

A planetary gear mechanism is attached to the rotating shaft. The planetary gear mechanism is a gear mechanism in which one of the three elements (the central sun gear, the peripheral ring gear, and the planetary carrier between the sun and ring gears) is fixed, and when rotation is given to one of the remaining elements, their speed increases or decreases in speed.

The planetary gear mechanism reduces the rotation of the rotor and converts it to the speed and torque required to turn the bit or drill.

How to Select Pneumatic Drills

The following are points to consider when selecting pneumatic drills:

1. Drill Shape

Pneumatic drills come in various shapes. Generally, most pneumatic drills are small in size, but the shape should be selected based on the size of the workspace and the intended purpose of the drill. The most common product is the pistol type, similar to electric drills. They can be used in various orientations and are easy to maneuver. There is also a straight type that is easy to use even when the workspace is small and an angled type that combines the best of the pistol and straight types.

2. Air Consumption

Air consumption is a key factor in the specifications of pneumatic drills. Select a compressor according to the air consumption.

3. Rotation Speed

The speed of pneumatic drills depends on the rotation speed. Especially, the higher the rotation speed, the easier it is to drill small-diameter holes.

Other Information on Pneumatic Drills

How to Use Pneumatic Drills

Pneumatic drills are used by connecting them to an air compressor that supplies compressed air. As with ordinary drills, the drill is placed over the area to be drilled and the trigger is pulled to rotate the drill while drilling.

The key point to note at this point is the air pressure. Each pneumatic drill has a specified range of appropriate air pressure. If the air pressure is out of this range, it will put unnecessary strain on the bit and the drill as well as the parts inside the air tool. Therefore, it is important to adjust the air pressure while using a regulator that allows the air pressure to be checked.

カテゴリー
category_usa

Spray Gun

What Is a Spray Gun?

A spray gun is a painting device that uses compressed air to spray paint and other materials.

They are used not only for coloring and painting but also for applying lubricating oil to prevent rust and for cleaning by injecting water.

The name “spray gun” comes from its shape, which resembles a pistol. They are easy to use because they can be sprayed simply by pulling the trigger. A separate compressor is required to generate compressed air. There are many spray patterns, with some types spraying over a wide area and others concentrating on a single point.

How to Use Spray Guns

To use spray guns, fill a cup with paint or other material and set it on the main unit. Then, connect a hose to the compressed air supply from the compressor and pull the trigger to spray the paint. The discharge volume can be adjusted by the adjustment knob. When painting, spray the paint 15cm to 25cm away from the object for clean painting.

Before starting work, it is necessary to wear a mask and protective glasses to prevent splashed paint from getting into the mouth and eyes.

How to Select Spray Guns

There are several factors to consider when selecting spray guns.

  • Gravity Type
    A Gravity-type spray gun has a cup attached to the top of the gun, and the paint is supplied by the gun’s own weight. It is lightweight and easy to handle, and it is characterized by being able to use up the paint to the end. Disadvantages include the small capacity of the cup and the inability to place the spray gun while it is filled with paint.
  • Aspirating type
    The suction type uses compressed air to create a vacuum for supplying paint by suction. Many cups have a large capacity, and the bottom is flat, allowing you to place them on the floor even when filled with paint. Disadvantages include the inability to use the paint up to the end and weaker spraying force due to the use of compressed air for suction.
  • Pressure-feeding type
    In the pressure-feed type, separate from the compressed air used for spraying, the paint hose sent from the pressure-feed tank is connected to the spray gun. Due to its large-capacity pumping tank, it is suitable for painting a large area at once. However, a drawback is that it takes time to prepare for the connection.
カテゴリー
category_usa

Floodlight

What Is a Floodlight?

Floodlights

A floodlight is a lighting fixture that uses a reflector or lens to emit light in a specific direction.

They are used when you want to focus on a target rather than illuminate the entire room, as is the case with light bulbs and fluorescent lamps.

There are four main types of light sources: LEDs, mercury lamps, metal halide lamps, and halogen lamps.

In recent years, LEDs have become the mainstream. The reasons for this are that LEDs consume less electricity, have a longer lifespan, and instantly become brighter. In addition, since the manufacture, export, and import of mercury lamps was banned from 2020, mercury lamps are being replaced by LEDs.

How to Use Floodlights

Floodlights are electrical devices, so to use them, you must first secure a power supply. There are types that supply power by plugging a cable into an outlet, and cordless types that use a rechargeable battery. Portable generators are used at construction sites and other locations so that lighting can be turned on anywhere.

Installation methods also vary, and sometimes a large number of them are installed in a single frame, as in baseball stadiums. Other times, they are suspended from the ceiling or installed with stands to adjust the height.

How to Select Floodlights

One way to choose floodlights are by the type of light source.

  • LED
    LED is by far the most popular floodlights sold today, and its energy-saving performance is far superior to that of conventional light sources, and its long life makes it safe to choose floodlights other than LED unless you have a special reason to choose it.
  • Mercury Lamps
    Mercury lamps used to be a mainstream light source, but their manufacture, import, and export are now banned because they use mercury, which is harmful to the human body and the environment.
  • Metal halide lamps
    Metal halide lamps also contain a small amount of mercury, but since they meet mercury content standards, they are not subject to regulation. Metal halide lamps can be made more energy efficient or emit light closer to natural light by changing the ratio of the gas mixture contained in the lamp.
  • Halogen Lamps
    Halogen lamps generate heat when emitting light, so snow does not accumulate on the lamps even if it snows. They also act as heaters to slightly raise the ambient temperature.