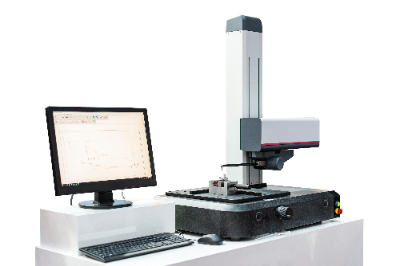
What Are Contour Measuring Machines?
 Contour measuring machines are devices that trace the contours of objects and accurately record, analyze, and measure their shapes.
Contour measuring machines that use a stylus to directly trace the surface of the object to be measured and accurately trace its movement are called contact-type contour measuring machines. On the other hand, a non-contact type traces the surface by capturing reflected light from the surface with a laser or other means.
While non-contact contour measuring machines are relatively easy to use, their disadvantage is that the condition of the reflected light varies greatly depending on the material and properties of the object’s surface. For this reason, contact-type measuring machines, which are not affected by conditions, are widely used.
Uses of Contour Measuring Machines
Contour measuring machines are widely used mainly for the development, production, and quality control of metalworking products. In addition, they are sometimes used for automatic measurement on the production line by programming a series of measurement operations.
Since the stylus-type contour measuring machines may scratch the surface, they are often used for spot-checking when the appearance of the product is important. Contour measuring machines can accurately measure shapes and dimensions at a fine pitch, so they can also be used for reverse engineering.
Principle of Contour Measuring Machines
This section describes the principle of widely used contact-type contour measuring machines. Contact contour measuring machines consist of a detector that moves horizontally and a stylus that moves up and down in a large circular arc.
The contour shape can be traced by constantly plotting the coordinates of the stylus tip using a digital scale, with the X coordinate from the horizontal movement and the Y coordinate from the vertical position of the stylus. Note that the arm to which the stylus is attached moves up and down as an arc motion.
In other words, the stylus tip also follows the shape of the object to be measured in a circular arc motion. Therefore, to plot the XY coordinates accurately, the error in the X direction caused by the arc motion must be compensated. Also, if the digital scale used to measure the vertical motion of the stylus can only measure linear motion, a mechanism is required to convert the arc motion into linear motion.
Accurate positioning is critical for detectors, so ball screws and stepping motors are used for this motion. In high-precision machines, electrical components such as the power supply and control board are generally independent as an external box to minimize the effects of thermal expansion.
Other Information on Contour Measuring Machines
1. Tracking Angle of Contour Measuring Machines
Contour measuring machines have a stylus at the end which is mounted vertically on the arm, so it cannot measure at right angles.
The angle at which contour measuring machines can measure is called the tracking angle, which refers to both the up and down directions. The angle of follow-up depends on the shape of the stylus, which has limits in both the ascending and descending directions.
If the stylus has a conical or symmetrical shape, the tracking angles are equal in the up and down directions. However, if the stylus has an asymmetrical shape, the follow-up angles for ascending and descending are different, so care must be taken. The tracking angle also varies depending on the measuring speed and measuring force, and the higher the measuring speed, the more difficult it is to track a steep slope.
2. Daily Inspection of Contour Measuring Machines
Contact-type contour measuring machines are subject to wear because the stylus tip is in contact with the surface to be measured. Even if wear is minimal, it is affected by hysteresis and other changes over time due to repeated use.
Therefore, periodic inspections are necessary, but frequent large-scale maintenance is not realistic in terms of man-hours and cost. Therefore, as a routine inspection, important functions and points related to performance are simply corrected.
Daily inspections of contour measuring machines mainly check and correct the following three points:
- Accuracy of Measured Values
We measure a calibrated reference unit, such as a block gauge, and correct any discrepancies between the calibrated value and the actual measured value. - Amount of Stylus Tip Wear
When measuring a valued step, etc., the stylus tip sinks in accordance with the amount of stylus wear, causing a slight discrepancy between the actual shape and the measured shape. Based on this discrepancy, the amount of wear is calculated and corrected. - Equivalence of Ascent and Descent Measurements
Measure symmetrical shapes, such as pin gauges and precision grade steel balls, and correct the distortion between the left and right sides of the measured shape so that they are equivalent.
In most cases, both corrections are automatically calculated by the software from the measured values, so it is important to control the use of the software to remember to perform daily inspections. Furthermore, if you want to obtain and maintain the automotive industry and quality management standards, such as IATF16949 and ISO9001, you must also perform calibration work that ensures traceability on a regular basis.