カテゴリー
category_usa

Concrete Vibrator

What Is a Concrete Vibrator?

Concrete vibrators are construction equipment used to compact concrete that has not yet been set (ready-mixed concrete).

After the concrete is poured into a formwork, vibration improves the fluidity and increases the density of the concrete. This action removes air from the concrete and distributes the aggregate evenly.

In the past, there were no machines such as concrete vibrators, so the formwork was pounded with a mallet or other tool, or the concrete was repeatedly pierced with a bamboo stick. It is said that this is why the term “placing” came to be used to refer to placing ready-mixed concrete.

Concrete vibrators have evolved over the years, and lightweight and convenient products have been developed, such as cordless types that can work without a power cable, and types equipped with a system that automatically turns the power on and off.

Uses of Concrete Vibrators

Concrete vibrators are mainly used at construction sites and in the manufacturing process of concrete products.

Examples of concrete vibrators are as follows

  • Placing concrete structures such as buildings and bridges
  • Casting concrete for housing foundations, retaining walls, etc.
  • Production of secondary concrete products such as gutters and retaining walls
  • Compaction of concrete pavements
  • Production of test pieces

Used in many locations to improve the strength and quality of concrete.

Principle of Concrete Vibrators

Typical concrete vibrators consist of a main body with an internal motor, a vibrating section at the end, a flexible shaft, and an electric rod. Vibrating parts of various shapes and sizes transmit vibrations to the cast concrete to ensure uniformity and density of the concrete material.

There are two main types of vibration mechanisms: the “internal vibration method,” which transmits vibration by inserting directly into the concrete, and the “formwork vibration method,” which transmits vibration indirectly from the outside. Concrete vibrators fall into the “internal vibration method” and are used on many job sites.

Concrete compaction, when done properly, results in good-quality concrete. Excessive vibration can cause “bleeding,” which is the separation of water from the material, and insufficient compaction can cause “jankers” that result in an uneven surface. Not only do these problems make the concrete look unsightly, but they also cause problems of insufficient strength, so care must be taken when installing concrete.

How to Select Concrete Vibrators

Concrete vibrators vary in terms of power source, the shape of the vibrating section, the diameter of the vibrating section, etc., depending on the product, so it is important to understand the features of each type and purchase the one that best suits the purpose of use.

1. Power Supply System

There are two types of power sources: AC and rechargeable. The AC power supply system is used at construction sites where a power supply is available and cable routing is not a problem. The rechargeable type should be used at construction sites where it is difficult to secure a power source.

The rechargeable type is available in 14.4 V, 18 V, and 36 V. The higher the voltage, the stronger the vibration, but the heavier it tends to be.

2. Shape of Vibrating Part

Concrete vibrators are classified into the following four types. Each type has a different shape of vibrating part, so it is important to select the appropriate type for your application.

Flexible Type
The hose part can be bent freely, so it can be used in places where the electric rod type cannot be used. This type is used for compaction of overcrowded reinforcement sites and narrow gaps in walls, beams, etc.

Electric Rod Type
The vibrating part of this vibrator is shaped like a rod, which is not soft but has a low vibration. This type is used for concrete processing in factories and at the tops of reinforcing bars.

Spatula Type
This type of vibrator has a spatula-shaped vibrating section and is used in the manufacture of thin concrete products such as U-shaped ditches and catch basins.

Punch Type
This type of concrete vibrator is used for removing air bubbles from inclined surfaces where air bubbles are difficult to escape, and for finishing the surface of concrete products in narrow formwork. It is also used in the manufacture of large products such as revetment blocks and rooting blocks.

3. Diameter of Vibrating Section

The diameter of the vibrating section of a concrete vibrator is a major factor in its operating efficiency. The effective range of vibration is considered to be about 10 times the diameter of the vibrating section, and the larger the diameter, the wider the effective range and the fewer times compaction is required. The larger the diameter, the wider the effective range and the fewer the number of compaction cycles. Using the right size product for the job will improve work efficiency and reduce working time.

Other Information on Concrete Vibrators

Precautions for Use

When using concrete vibrators, please note the following

  • Vertically insert the vibrators at equal intervals.
  • Vibration should be applied for 15 to 20 seconds. If more than 15 to 20 seconds is applied, material separation may occur.
  • In the case of reinforced concrete construction, work so that the vibrator does not come into contact with the reinforcing steel bars inside the structure.
  • Do not turn off the concrete vibrators while they are plugged in.
  • Since this is a vibrating tool, take moderate breaks or use anti-vibration gloves.
カテゴリー
category_usa

Reinforcing Bar (Rebar) Bender

What Is a Reinforcing Bar (Rebar) Bender?

A rebar bender is a tool for cutting rebar, and there are manually-operated, power operated, and rechargeable rebar benders that use the principle of leverage. While metal saws can also cut rebar, rebar benders are specifically designed for this purpose. Even manual rebar benders can easily cut rebar with less force compared to metal saws.

In addition to manual and electric, there are block types and chip saw types in the cutting method. Each type has its own characteristics in terms of finish and ease of work. Therefore, it is necessary to select the right type based on the intended use.

Uses of Rebar Benders

Rebar benders are tools designed for cutting rebar and can work more efficiently than using a metal saw. Therefore, rebar benders are useful at construction sites where many rebars need to be cut in succession. The larger the scale of the construction, the more rebars need to be cut, making a rebar bender that can work efficiently essential.

In addition, rebar benders are indispensable tools for construction sites because they can cut rebar after steel frames have been assembled.

How to Select Rebar Benders

Here are some points to consider when selecting rebar benders:

Power source

There are three types of power sources for rebar benders: manual, electric, and rechargeable.

  • The manually operated rebar benders use this principle. Unlike electric and rechargeable rebar benders, they can be used in any location and under any circumstances.
  • Electric rebar benders are more powerful and compact than their manual counterparts. It has advantages such as not taking up space for storage and being able to work efficiently. However, there are also disadvantages such as not being able to use it unless it is in a place where a power source can be obtained and the cord getting in the way depending on the situation.
  • Rechargeable rebar benders are rebar benders that combine the power of an electric rebar bender with the ease of use of manual rebar benders. They can be used for long periods of time on a short charge, but they are often expensive.

Cutting Methods

There are two types of rebar bender cutting methods: block and tip-saw.

  • The block type is the most common cutting method, primarily used with electric and rechargeable machines, cutting rebar by crushing it. While it efficiently cuts reinforcing steel bars, the cut surface is characterized by roughness.
  • Unlike the block type, the chip saw type has the advantage of a clean-cut surface. However, it has the disadvantage that dust tends to fly and the blade wears out after long hours of work.
カテゴリー
category_usa

Reinforcing Bar (Rebar) Cutter

What Is a Reinforcing Bar (Rebar) Cutter?

A rebar cutter is a type of tool that uses electric motors or hydraulic pressure to cut rebar used in reinforced concrete structures. There are two types: one that compresses and cuts the rebar with a block-shaped blade, and the other that cuts it with a rotating blade.

The methods are:

  1. Manual type: The structure is cut by pushing in the handle and applying force.
  2. Manual hydraulic type: The structure that amplifies the force by using a hydraulic pump to transfer the manual energy to the block-shaped blade to cut the reinforcing steel bars.
  3. Electric hydraulic type: A structure that uses electric energy to activate the hydraulic pump to cut the rebar with a block-shaped blade.
  4. Electric chip-saw type: The structure is designed to cut the rebar with a blade (chip saw) rotating at high speed.

Uses of Rebar Cutters

Rebar cutters are cutting tools specialized for cutting reinforcing steel bars used in reinforced concrete structures. Rebar is a building material that requires cutting as it is manufactured in long bars and coils.

Rebar cutters specialized for rebar are used to quickly, efficiently, and safely cut rebar of various thicknesses. In addition, rebar cutters do not produce sparks when cutting, so they are sometimes used at rescue sites such as traffic accidents.

How to Choose Rebar Cutters

Rebar cutters are selected mainly from the following three perspectives:

  1. Rebar hardness (SD) and diameter (D)
    There are various types of rebar, which are measured in terms of diameter thickness (D) and hardness (SD).
    It is necessary to check the cutting capacity in catalogs and other sources before purchasing. Especially for hardness (SD), a higher value indicates increased hardness, and there is a possibility that the material may not be cut. Therefore, it is crucial to verify whether the rebar cutter can handle the specific hardness level of the material in question.
  2. Manual and electric                                                                  The prices are in the following order: manual < manual hydraulic < electric hydraulic < electric chip saw.                                     Electric is good if efficiency is important, and manual is good if cost performance is important.
    Considering the workload and speed, the electric one is overwhelmingly more efficient. When using it for work such as on-site, it can be said that electric power is better from the viewpoint of workload. If you don’t have a lot of work for DIY purposes, a manual is enough.
  3. Uses
    The choice depends on whether bending or crimping after cutting is required. You need to choose flexibly depending on the application. If bending is required, the manual type is better. If crimping after cutting is required, an electric chip saw, which does not require post-cutting processing, is the most efficient.
    Also, if noise cannot be made at some sites, a hydraulic type must be used.
カテゴリー
category_usa

Grooving Tool

What Is a Grooving Tool?

A grooving tool is a motorized cutter, also called a grooving tool cutter, for digging grooves in wood.

Despite being a relatively heavy machine, the grooving tool is capable of digging grooves with high precision.

At first glance, grooving tools look similar to circular saws, and it is necessary to carefully understand the characteristics and differences between them before selecting the appropriate tool for use.

In some cases, a circular saw can be used in place of a grooving tool.

Uses of Grooving Tools

The grooving tools were originally developed for grooving thresholds and duckways.

Grooving tools can be used to dig highly precise grooves not only for making thresholds but also for other purposes.

How to Choose Grooving Tools

Here are some points to consider when choosing grooving tools:

Weight

Typical grooving tools weigh between 4kg and 7kg. Large grooving tools are heavier and more difficult to handle, but they are also more stable.

Types of Blades

There are two main types of grooving tool blades: the free-form cutter blade and the seven-minute cutter blade.

  • Self-rotating cutter blade
    The width of the groove can be determined by twisting and rotating the blade. Since the width is created by twisting the blade, the wider the groove, the more rounded the bottom of the groove. Also, the larger the groove width, the greater the twisting of the blade and the greater the vibration.
  • Seventh Cutter Blade
    Seventh cutter blades are used in the processing of thresholds. The width of the blade itself makes it possible to dig grooves. Therefore, the width of the groove cannot be changed. The bottom of the groove will be horizontal if you use a 70% cutter blade. In addition to processing lintel thresholds, it is also used for processing studs and side panels of stairs.

There is no major difference between old and new grooving tools, as their functions have not changed significantly from ancient times to the present.

カテゴリー
category_usa

Duct Fan

What Is a Duct Fan?

A duct fan is a type of blower used for exhausting smoke and hazardous gases in equipment ventilation exhaust ducts and onsite.

Among blowers, a rise in discharge pressure of 10 kPa or less is called a fan, while a rise in discharge pressure of 10 kPa to 100 kPa is called a blower.

The term duct in this case does not necessarily refer only to a fan used for the airflow and exhaust piping, but also to a fan with a flexible duct of discrete shape on the fan’s airflow side.

Air conditioning and ventilation equipment used in various buildings such as offices, hotels, movie theaters, and factories are sometimes called line fans.

Uses of Duct Fans

Duct fans are used to exhaust smoke, dust, noxious gases, paint odors, and heat generated on job sites and in factories, to ventilate underground or enclosed spaces for construction, etc.

In this case, instead of being installed and used at a specific location all the time, it is used in various locations with casters or a compact portable type.

Stationary Duct Fans are also sometimes used in greenhouses for vegetable cultivation, for example, as fans for photosynthesis accelerators that pump carbon dioxide gas into the greenhouse.

How to Select Duct Fans

The following points should be considered when selecting Duct Fans:

1. Power Supply Specifications

It is necessary to check the following power supply specifications in the environment where the Duct Fans will be used, and select a suitable one.

Voltage: AC100, 110, 200, 220V
Number of phases: single phase, three phase

For explosion-proof zones, an explosion-proof type should be selected. Additionally, if the fan is operated by a control system, the nominal output, load current, starting current, consumption current, etc., are also necessary pieces of information for proper selection.

2. Air Blowing Capacity

It is important to select the maximum airflow (flow rate with no obstruction at the fan suction and discharge ports) and the maximum static pressure (pressure generated when the fan suction or discharge ports are completely blocked) that are appropriate for the work and environment. Generally, characteristic graphs of airflow and static pressure as fan performance are available from the manufacturer in catalogs, etc., and should be utilized in the selection process.

3. Other

The larger the outer diameter, the larger the overall dimensions, the heavier the weight, and the higher the air volume.

カテゴリー
category_usa

Polisher

What Is a Polisher?

Polishers are tools that polish the surface of materials by rotating a buffing disc at the tip.

Polishers differ from other polishing tools, such as disc grinders, in that disc grinders can only perform relatively coarse polishing, while polishers can perform fine polishing, such as polishing a car to a shine.

It is possible to polish surfaces such as automobiles, furniture, and metals to a shine. It is more efficient than polishing by hand to achieve a beautiful finish. Polishers are used not only by professional craftsmen but also by DIY enthusiasts.

Uses of Polishers

Polishers are primarily used for fine polishing work, such as bringing out the luster of a material. Polishing tools such as disk grinders and disk sanders can only be used for rough polishing and are not suitable for finishing work.

A particularly common application is polishing the bodies of cars and motorcycles. Polishers can be used to restore a new shine to a scratched or faded car body. It is also used to polish wood surfaces such as furniture, floors, and walls.

Wood tends to change color over time, but polishing with polishers can help preserve its original beautiful color. Polishers are also useful for removing rust from metalware and polishing dishes and jewelry to a shine.

Principle of Polishers

Polishers polish objects by spinning a motor when connected to a power source, which transmits the rotational force to the polishing pad. The polishing pad rotates at a constant speed and polishes the surface of the object by its frictional force.

The polishing pad is also coated with a special liquid called an abrasive. The abrasive contains microscopic particles, which serve to remove dirt and scratches from the object’s surface.

Thus, polishers use the principle of combining the power of the motor and the abrasive to polish objects.

Types of Polishers

There are three types of polishers depending on the rotation method: single action, gear action, and double action.

1. Single Action

The single-action type has the highest polishing power, with the buff rotating in only one direction. It is powerful and can polish a wide area in a short time, but has disadvantages such as being easily scratched and difficult to handle.

2. Gear Action

In gear action, an irregular motion is added to the rotational motion, so the polishing power is inferior to that of a single action, but it is more than a double action. It has the advantage of not scratching materials easily.

3. Double Action

In double action, an eccentric motion is added to the rotational motion, so the polishing power is the lowest. On the other hand, it does not scratch the material easily, and it is used for final finishing and has the advantage of delicate polishing. It is recommended for beginners because it is easy to polish evenly.

How to Select Polishers

The following are points to consider when selecting polishers.

1. Power Source

Polishers come in two types: rechargeable and mains-powered. Polishers consume a great deal of electricity, so mains-powered products are generally the most commonly used. Rechargeable polishers can be used for small areas or short polishing times.

2. Number of Revolutions

Polishers are available at a variety of speeds. The higher the rotation speed, the higher the polishing power, but the more easily scratched the more frictional heat is generated.

Since a high-speed polisher requires more skill to handle, it is recommended that beginners choose a low-speed polisher or an adjustable-speed polisher.

3. Size of Polishing Pad

A large pad can polish a large area, but a small pad is necessary for fine details. It is important to select a pad of the appropriate size for the intended use.

4. Weight and Shape

When using a pad for a long time, a pad that is light in weight is less tiring. Also, selecting a pad with a shape that is easy to grip will make it easier to work with.

カテゴリー
category_usa

Shear

What Is a Shear?

A shear is an electric tool for cutting metal sheets. The work of cutting with metal cutting scissors can be done more efficiently with motor power. Shears are mainly used at sheet metal processing sites. They are more suitable for cutting flat objects than curved or uneven objects.

The two blades on the top and bottom of the shear clamp onto the material and use shearing force to cut it.

The above cut using shearing force is called the shearing process. Below are the characteristics of common shearing processes:

  • No chips are produced
  • Material warps and burrs easily

How to Use Shears

In preparation before cutting, the shears are connected to a power source and adjusted to the thickness of the material to be cut.

Press the tip of the activated shears against the material to cut it. To cut a curved line, move the shears slowly as if using scissors.

The shears are moved from the front to the back.

When working with shears, be careful of the following:

  • To avoid injury from touching the cutting edge of the shears, be sure to turn off the power when adjusting the cutting edge.
  • Keep your hands away from the cutting edge of the shears during cutting.
  • Do not place your hands in the direction of the cutting progress.

How to Select Shears

An important aspect of shears selection is to consider the type of shears and the material it is made of.

It is best to use two different types of shears depending on the intended use of the cut.

  • Hand shears can cut through the material in a short time. On the other hand, they are prone to warping and burring.
  • The straight shears are used when you want to cut straight. Compared to hand shears, straight shears produce chips more easily and are less prone to burrs.

It is necessary to make sure that the shear is compatible with the material thickness and material type. For stainless steel, the hand shears can handle material thicknesses up to 2.5mm, and the straight shears up to 1.2mm. Materials include copper, aluminum, and stainless steel.

In addition, shears are available in power-operated and rechargeable types. Considering the time of use, location, and other factors, it is advisable to consider whether a power supply or rechargeable type is better.

  • The power supply type cannot be used in places where a power source is not available, thus limiting the work area.
  • The rechargeable type requires charging in advance, but the workplace is not limited.
カテゴリー
category_usa

Reciprocating Saw Blade

What Is a Reciprocating Saw Blade?

Reciprocating saw blades are replacement blades for saber saws, which are power tools used to cut pipes, wood, and thin steel plates.

The blade is attached to the body of the saber saw and used to cut objects by reciprocating motion. There are several types of blades depending on the material of the object to be cut.

By using dedicated blades, it is possible to cut a variety of materials, such as stainless steel and ALC. Note that a saber saw is also called a “reciprocating saw.”

Uses of Reciprocating Saw Blades

Reciprocating saw blades are used to replace the blades on a saber saw in accordance with the material to be cut. The coarser the blade, the rougher the cutting surface. Therefore, they are not suitable for precision cutting. It is suitable for cutting work such as logging and demolition.

They are also used when blades are damaged or become hard to cut. If the blade is not sharp or has rust, it should be replaced with a new one. Blades in poor condition require extra force and cannot be worked safely.

Principle of Reciprocating Saw Blades

Reciprocating saw blades have a common standard and can be installed on all brands of saber saws. Since the shape of the mounting part is the same and they are interchangeable, there is no need to stick to the genuine product.

When installing the blade, loosen the sleeve on the main unit and insert the blade into the back to lock it in place. When the blade is in contact with the object and the main unit is switched on, the blade moves back and forth to cut the object.

When installing or removing the blade, the battery must be removed from the main unit. If the main unit is activated when replacing the blade, it is dangerous because it could lead to unexpected injury or accident.

How to Select Reciprocating Saw Blades

When selecting reciprocating saw blades, it is important to consider the following four factors:

1. Material to Be Cut

It is important to select reciprocating saw blades that are appropriate for the material to be cut. Not only will the blade be less likely to break, but it will also improve the efficiency of the cutting operation. There are special blades for different materials such as stainless steel, steel plate, wood, bamboo, ALC, cast iron pipe, and PVC.

Also, if the material to be cut is made of hard material, the blade thickness will be thicker. For example, a stainless steel pipe of 3 mm thickness requires a blade of 1.3 mm thickness.

2. Size of Workpiece to Be Cut

The length of reciprocating saw blades should be selected based on the size of the workpiece to be cut. Commercially available blades are 150 to 300 mm in length, so it is necessary to check whether the blade is compatible with the main unit.

The shorter the length, the easier it is to work with less blurring. However, since blades have “total length” and “effective length,” it is necessary to select a blade that is longer than the size of the workpiece to be cut. Check the cutting capacity specifications to determine the size of the workpiece that can be safely cut.

3. Shape of the Workpiece to Be Cut

Most reciprocating saw blades are of the straight type for general-purpose use. However, when cutting pipe material, a curved type blade is easier to cut because it fits the material to be cut. Using different types of blades depending on the shape of the workpiece increases work efficiency.

4. Finish of the Cut Material

The finish of the cut piece is determined by the blade’s grain (number of peaks). Coarse blades produce a rougher cut surface but cut faster. Conversely, dense blades cut slower but produce a relatively clean-cut surface. Select the number of blade peaks according to the required finish.

The number of teeth is the number of teeth per inch (25.4 mm). Typically, 6, 10, 14, or 18 teeth are used, but there are also “10/14 teeth” blades, which are called combination blades.

Half of an inch (0.5″) has 10-pit eyes, and the other half has 14-pit eyes, providing a good balance of cutting speed and finish.

カテゴリー
category_usa

Sledgehammer

What Is a Sledgehammer?

Chipping Hammers

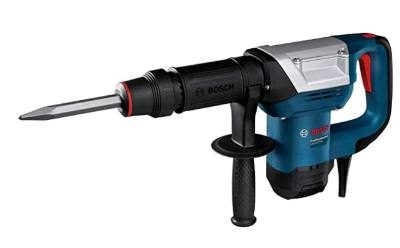
A sledgehammer, often referred to as an electric hammer or pick, is a powerful tool used for breaking concrete and other hard materials. Despite its name, it is versatile and can adapt to various tasks—such as driving pipes, digging, and paint removal—by changing the tip tool.

Its ability to demolish hard concrete structures, which electric drills struggle with, makes it a vital tool on construction sites.

Uses of Sledgehammers

Sledgehammers excel in breaking concrete, making them essential for road construction, electrical work, and demolition tasks. They are also used for:

  • Road surfacing
  • Concrete structure demolition
  • Creating holes in electrical outlets
  • Landscaping and ground excavation
  • Stonework
  • Tile and brick removal

Structure of Sledgehammers

A sledgehammer consists of a main body and a blade, either a bull point or chisel, usually powered by electricity. It operates on the principle of applying a strong, downward force to break through concrete or stone, similar to manual chiseling. Some models feature a low-vibration mechanism to reduce operator fatigue and prevent vibration-related injuries.

How to Select Sledgehammers

Consider the following when choosing a sledgehammer:

1. Shaft Standard

The tool’s shank, or shaft, varies by product. Hexagonal shafts offer a secure grip, preventing slippage, while SDS-MAX and SDS-Plus shafts, developed by Bosch, cater to different size requirements and applications. Ensure compatibility with the hammer’s body before purchase.

2. Striking Force

Striking force ranges from 6 J to 70 J. Select a hammer that balances power with manageability to avoid undue fatigue, based on the task at hand.

3. Power Source

Choose between power-operated and battery-powered models based on usage needs. Given the high power consumption of sledgehammers, power-operated types are recommended for prolonged use.

Other Information on Sledgehammers

Precautions for Operating Sledgehammers

  • Wear protective glasses and a dust mask, and use ear protection in noisy environments.
  • Verify that the power source matches the hammer’s specifications to avoid injury from excessive speed.
  • Avoid electrical shock by not contacting grounded surfaces during use.
  • Check for buried cables and pipes before drilling into walls, ceilings, or floors.
  • Wear appropriate clothing to prevent accidents caused by entanglement in the tool.
カテゴリー
category_usa

Scale

What Is a Scale?

ScalesA Scale is a general term for a tool to measure the weight of a material.

Scales are used to measure relatively large objects (e.g., parcel delivery, food), while balances are used to measure relatively small and delicate objects (e.g., hospital or pharmacy medicine).

Scales and balances are classified as digital or analog, respectively. Digital Scales are available in a wide range of sizes and weights and are more widely used than their analog counterparts. On the other hand, analog scales are also in demand depending on the intended use, so it is necessary to distinguish between them.

Uses of Scales

Scales are used in different ways for digital and analog weighing.

1. Digital Weighing Instruments

Digital Scales are used for a wide range of applications, from minute measurements such as those of pharmaceutical preparations, to large scale calculations such as those used to calculate the weight of postal items. For example, highly accurate electronic balances are used to measure pharmaceutical preparations, and large scales that can weigh up to 50 kg are used to calculate the weight of postal items.

While electronic balances are highly accurate, they are easily affected by the operating environment and workers, such as air conditioning, humidity, and vibration. Therefore, it is necessary to review the environment and inspect the balance itself before weighing. Regular maintenance by a vendor is also important.

2. Analog Type Weighers

Analog Scales do not require high precision and are useful for speedy operations. Of course, like digital scales, they can measure relatively small to large objects. However, the advantages of analog scales are that they are less expensive and easier to maintain than digital scales, and they do not require a power supply or batteries.

Principle of Scales

Analog Scales, also called spring scales, are available in hanging, upper pan, and stand types. Scales use the elastic force of a spring to measure weight. On the other hand, an analog scale weighs an object on one side of the balance and a weight on the other.

The principle of a digital scale, such as a kitchen scale, is based on the load cell method. The weight is scaled based on the electrical resistance of the object to be measured when it is placed on the balance.

Digital balances are generally classified into two types: electromagnetic and load cell.

In the electromagnetic method, electromagnetic force is applied instead of weights used in analog balances, and the magnitude of the electric current is used to Scale the weight. Electromagnetic weighing is said to be more accurate than load weighing.

How to Select a Scale

When selecting a scale, pay attention to the following points:

1. Weight Capacity

All Scales have a maximum weight that can be handled. Therefore, in principle, the weight of the object to be measured should be less than or equal to the maximum weight that the scale can handle. If the weight exceeds the maximum weight, the scale will not be able to accurately measure the weight, and the scale itself may be damaged.

To avoid damage, it is important to select a scale that has some margin for the weight of the measured object. In addition, when selecting a specific weighing instrument, it is necessary to focus not only on the maximum measurement volume but also on the scale interval on display

2. Scale Interval

The scale interval is the minimum value that a scale can measure. It is important to select the appropriate scale after confirming the necessary scale interval in advance.

For example, a scale that can measure down to 1 µg, such as an electronic balance, should not be used to measure postal items. If you try to detect too small a scale interval, the stability of the value will be slow. 

3. Loading Surface Dimension

The loading surface dimension is the size of the pan on which the item to be measured is placed. It is important to select a measuring instrument with a dish that is large enough to accommodate the size of the object to be measured.

For example, if you are measuring powder or liquid in a container, you need to select a dish that is larger than the size of the container. This is because accurate weighing is not possible if the load is larger than the dish size.