カテゴリー
category_usa

Circular Saw

What Are Circular Saws?

Circular Saws

Circular saws are power tools equipped with a rotating circular blade and are primarily designed for straight-line cutting of wood and other materials. They stand out for their efficiency in woodworking, enabling both rough cuts for logs and precise cuts for wood planks.

Applications of Circular Saws

These versatile tools find applications beyond woodworking, cutting through metal and plasterboard in various industrial, construction, and hobbyist projects. For precision cutting, stationary circular saws guided along a fixed path are preferred over hand-held models.

Operating Principle of Circular Saws

Driven by a motor, the circular blade of a saw slices through material with rotational force. Its simplicity and the direct transmission of torque from the motor to the blade afford it powerful cutting capability and durability. Despite their effectiveness, they are designed with safety features like dust collection to manage debris and various models to cater to specific needs, including corded and battery-powered versions.

Selecting Circular Saws

When choosing a circular saw, consider the material type, required cut depth, and the tool’s weight for user comfort. Material-specific saws ensure proper cutting without damage, while blade diameter influences cut depth. Lightweight saws enhance maneuverability and reduce user fatigue during prolonged use.

Important Tips on Using Circular Saws

Utilizing circular saws requires attention to safety and precision. Properly adjusting the blade angle and depth, ensuring the safety cover’s functionality, and adhering to safety protocols like wearing protective gear are essential. Additionally, securing the workpiece and keeping hands away from the blade minimize accident risks, while routine maintenance like blade retraction and replacement preserve the saw’s performance and safety.

カテゴリー
category_usa

Hand Tool Sander

What Is a Hand Tool Sander?

Hand Tool Sanders

A hand tool sander is a device designed to sand surfaces to make them smooth. Unlike sandpaper, which is flexible and foldable, a hand tool sander is more efficient for treating flat surfaces, using its entire surface area for sanding.

These sanders typically consist of a metal plate to which sandpaper is attached and a grip for easy handling.

Uses of Hand Tool Sanders

Hand tool sanders are particularly useful for smoothing large surfaces, like wood. They are ideal for finishing work on wood surfaces that don’t require planing, such as columns. They’re also effective in removing paint from extensive flat areas.

While they are more suited for larger areas, hand tool sanders can also be convenient for smaller or curved surfaces.

Principle of Hand Tool Sanders

Compared to hand sanding, hand tool sanders distribute force more evenly across the sandpaper, reducing arm fatigue and ensuring a smoother finish even after prolonged use. They typically feature a mechanism to hold the sandpaper securely in place during the sanding process.

Some models employ a Velcro system on the metal plate for easy attachment of sandpaper. However, these types require sandpaper compatible with the Velcro system.

Though hand tool sanders are user-friendly and efficient, they can be tiring and consume a lot of sandpaper when used for extensive work. In such scenarios, an electric sander powered by electricity is often preferred.

カテゴリー
category_usa

Glass Cleaner

What Is Glass Cleaner?

Glass Cleaners

Glass cleaner is a detergent specifically formulated to remove grease and water stains from windows, glass, and mirrors. It comes in various types, each suited for different applications such as household, automotive, and commercial settings.

Most glass cleaners are alkaline and contain surfactants, effectively dissolving and removing oil stains.

Diverse in form, glass cleaners can be applied via spray and wiped off with a sponge or rag, or come as pre-soaked sheets, offered by numerous manufacturers.

Uses of Glass Cleaners

Glass cleaners are primarily used for cleaning windows and automotive glass. They also serve as a primer for car window glass coatings. Some automotive glass cleaners include abrasive particles.

For household use, they effectively remove stains from various surfaces including living rooms, bathrooms, cupboards, plastics, glass tables, and showcases. However, they are not recommended for LCD and plasma display screens due to their alkaline nature and are also unsuitable for wood and walls where water can seep through.

Principle of Glass Cleaners

Composed of alkaline or slightly alkaline surfactants, glass cleaners work on the same principle as regular detergents, breaking down oil and further dissolving it. Some include alcohol as an ingredient. Alkaline electrolyzed ionized water variants are also available, but may struggle with stubborn stains.

To use, spray the cleaner and then wipe it off with a lightly wetted, wrung-out cloth, or a dry cloth. For cars and windows, apply water for rinsing.

There are three main types of glass cleaners: those that flatten the oil film, those that remove it like a detergent, and those with abrasives. They are available in liquid spray, foam spray, aerosol, and sheet forms. Alkaline products can be rough on hands, so it’s advisable to wash hands after use.

Ingredients of Glass Cleaners

Glass cleaners typically contain the following ingredients:

  • Water
  • Alcohol
  • Glycol ether
  • Surfactant
  • pH adjuster
  • Fragrances and colorants

Alcohol and glycol ether dissolves organic stains effectively. However, water is added to raise the flash point to prevent fire hazards due to their low flash points. Surfactants ensure the liquid spreads evenly on the glass, and pH adjusters help remove alkaline water stains. Fragrances and colorants improve the product’s scent and appearance and help distinguish it as a glass cleaner.

How to Use Glass Cleaners

When using glass cleaners, it’s important to apply them properly. Spray from an appropriate distance to ensure even coverage without forming pools or failing to adhere. When cleaning areas above eye level or on glass attached to electrical appliances, use a soaked cloth. For frosted glass, spray evenly, scrub with a brush, and then wipe with water.

カテゴリー
category_usa

Cup Brush

What Is a Cup Brush?

Cup Brushes

A cup brush, also known as a bowl brush, consists of bristles mounted on the circumference of a cup. It’s primarily used for paint removal, rust removal, polishing, and cleaning. They are designed to attach to power and pneumatic tools such as drills, tabletop drilling machines, and straight grinders.

Cup brushes are made from various materials including nylon, stainless steel, and brass. Metal brushes, especially wire brushes, are commonly used for tasks like metal rust removal and paint stripping.

Uses of Cup Brushes

When attached to rotating power tools such as grinders and drill drivers, cup brushes efficiently scrape off rust, remove paint, and polish surfaces. These attachments are specifically designed to fit the shape of the power tool, enhancing their effectiveness.

Suitable for large, flat surfaces, they can polish extensive areas much more quickly and evenly than manual methods. However, they are not suitable for use on non-flat surfaces.

Principle of Cup Brushes

Cup brushes with metal bristles, often referred to as wire brushes, are ideal for grinding tasks like rust and paint removal from metal surfaces. By attaching these brushes to power tools, the efficiency of such tasks is significantly enhanced.

The choice of brush material affects its usage: stainless steel brushes for polishing stainless steel and aluminum products, brass brushes for brass, copper, and alloy items, and gold-plated brushes for general metal surface polishing, rust removal, and paint stripping. Grit (nylon with abrasive grains) brushes are also used for similar purposes.

While cup brushes are effective for broad areas, they are limited to flat surfaces. A related tool, the bevel brush, is better suited for narrow or curved surfaces. Bevel brushes are also less likely to break or scatter bristles at high speeds compared to cup brushes.

カテゴリー
category_usa

Soldering Iron Stand

What Is a Soldering Iron Stand?

Soldering Iron Stands

A soldering iron stand is a device designed to securely hold a soldering iron. There are mainly two designs: an M-shaped wire stand and a spiral wire stand where the soldering iron is inserted at the tip. Both types serve the same function, providing a stable and convenient placement for the soldering iron. Modern soldering iron stands offer enhanced usability and stability.

Some models come with a cleaner and an iron holder as a set, allowing for easy cleaning post-soldering iron use.

Uses of Soldering Iron Stands

Soldering iron stands are essential for safely holding soldering irons during use. They are particularly important in educational settings, like technology classes, or during electronics work. Without a stand, the hot soldering iron might cause burns or roll around, posing a risk. The soldering iron typically reaches temperatures around 270 °C, so careful handling is crucial. Remember to keep the power cord attached to the stand to avoid accidental overturning.

Principle of Soldering Iron Stands

There are three main types of soldering iron stands: the general-purpose stand, the pencil type, and the gun type. The general-purpose stand often features an M-shaped steel holder and offers portability but less stability. The pencil type has a coiled holder that efficiently dissipates heat and securely holds the iron. The gun type is similar in safety as it protects the tip. Specialized stands are available for ceramic heaters. Stands equipped with a sponge or scraper are convenient for cleaning the iron tip. Most stands are made of iron, cast iron, or steel, with cast-iron bases offering more stability. Ensure the stand is placed on a flat surface to prevent tipping.

How to Use a Soldering Iron Stand

Ensure the soldering iron stand is placed on a stable surface. Avoid clutter around the work area and ensure the iron’s power cord is not entangled. Regularly clean the iron tip, especially when solder residue or flux accumulates, to maintain efficient heat transfer. Cleaning tools like a sponge or cleaning wire are often included with the stand.

Sponge

Moisten the sponge before soldering, ensuring it’s not overly wet. Gently clean the iron tip with the sponge without applying excessive pressure to avoid temperature drops.

Cleaning Wire

The cleaning wire serves a similar purpose to the sponge and is particularly effective for fine tips. Use it by pricking the iron tip into the wire lump. The wire, often coated with flux, helps clean the tip without significantly reducing temperature. Replace the wire when it becomes shredded or its cleaning effectiveness reduces.

カテゴリー
category_usa

Electric Screwdriver

What Is an Electric Screwdriver?

Electric Screwdrivers

An electric screwdriver is motorized drills that can easily drill holes in wood and metal. There are many types of electric screwdriver, and you can select the number of revolutions and power. Even hard products can be drilled efficiently if you choose the right electric screwdriver for your conditions.

An electric screwdriver is available in both power-cord and battery-powered types. The power cord type can be used continuously for a longer time and has more power. Many battery-powered electric screwdrivers are small and lightweight and can be handled by women.

Note that batteries and chargers may be sold separately.

Uses of Electric Screwdrivers

Electric screwdrivers are used for drilling holes in wood, metal, and other materials. There are three types of electric drills: wood, metal, and iron. Electric screwdrivers are also often used in DIY projects, such as furniture assembly.

Basically, electric screwdrivers are specialized for drilling holes and cannot be used for tightening screws. However, some electric screwdrivers with variable speed functions can be used for screw tightening. If you want to tighten screws as well as drill holes, use a screwdriver drill.

Principle of Electric Screwdrivers

Electric screwdrivers consist of a motor, reduction gear, and drill chuck.

A drill bit is attached to the tip of the drill. The hole is drilled with a spiral groove so that shavings can be efficiently pushed outward. Check the maximum drilling capacity, diameter, and length of the drill to see if it is suitable for the size and material of the hole to be drilled. One with higher power consumption has more power.

When using an electric screwdriver, set the drill on the rotating shaft. The motor rotates the rotating shaft and transmits the rotation to the drill, which then drills. The speed of rotation of the motor is slowed down and adjusted by gears. To prevent misalignment, a guide hole is drilled, or a guide is provided. When using electric screwdrivers, protective goggles and dust masks should be worn since the drilled material will fly around.

Once you become accustomed to working with the drill, you can hold it with one hand, but holding it with both hands is more stable and produces a better result. Some larger products have side handles for better stability.

There are two types of chucks for replacing bits: keyed chucks and keyless chucks. Keyless chucks are convenient because you can change the bit without a tool. 

How to Use Electric Screwdrivers

This section explains how to use electric screwdrivers for beginners who have never handled one before. While taking sufficient safety measures, learn how to use the electric screwdrivers with the correct knowledge in order to get the most out of its performance.

How to Hold an Electric Screwdriver

First, we discuss how to hold the electric screwdrivers. Electric screwdrivers are shaped like a gun and you may have an image of holding it with one hand, but holding it with both hands increases stability and allows you to drill holes accurately.

The dominant hand should hold the grip of the electric screwdrivers and apply force in a straight line in the direction of drilling, while the non-dominant hand should support the body of the drill. When pushing the electric screwdrivers hard, slightly push the main unit to assist.

Most very powerful large electric screwdrivers have a handle in addition to the normal grip and are basically two-handed. Hold the grip and handle with both hands and hold them firmly. This will help stabilize the drilling trajectory. An example of a large electric screwdrivers are vibration drill used to drill holes in concrete and other hard materials.

Hole Drilling Method

The next step is the drilling method. When drilling holes, it is not possible to change the trajectory in the middle of the process, so be sure to drill precisely set guide holes with a slight hammer or cone before starting the production process. Re-doing the drilling or wasting time drilling holes in the wrong places can weaken the durability of the material and cause it to crack. Drill straight holes, taking care to avoid slanting the electric screwdrivers.

Precautions for Penetration

Finally, a word of caution when penetrating. When drilling a hole through a material, the chuck of the electric screwdrivers may hit the material surface with excessive force at the moment of penetration. This is very dangerous because if the chuck hits the material too hard, the material may be damaged or the electric screwdrivers may be accidentally dropped due to excessive momentum. If the electric screwdrivers are about to penetrate, we recommend you reduce the power of the push-in force, slow down the speed of rotation, and drill the hole carefully.

カテゴリー
category_usa

Air-Powered Saw

What Are Air Powered Saws?

Air Powered Saws

Air powered saws, or pneumatic saws, utilize compressed air to operate the saw blade for cutting various materials. These tools are noted for their high-speed blade vibration, enabling quick and precise cuts. Common in industrial settings and metalworking, air powered saws connect to an air compressor for their power supply.

Uses of Air Powered Saws

These versatile tools are employed across numerous fields, including metalworking for cutting metal sheets and piping, construction sites for rebar and building materials, automotive repairs for component modification, and even in forestry and woodworking for efficient timber processing.

Principle of Air Powered Saws

Operating on compressed air, these saws contain an air motor that vibrates the attached saw blade at high speeds. This action allows for effective cutting of materials upon contact. The cutting capability varies with the air pressure and the type of saw blade used, emphasizing the need for appropriate blade selection based on the material.

Choosing Air Powered Saws

When selecting an air powered saw, consider the cutting capacity required for your tasks, ensure the air pressure compatibility with your air compressor, and decide based on the saw’s stroke rate, which affects the cutting speed and precision. These factors will guide you in finding a saw that meets your specific needs.

カテゴリー
category_usa

Tire Pressure Gauge

What Is a Tire Pressure Gauge?

Tire Pressure Gauges

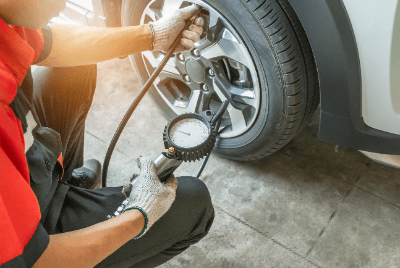
A tire pressure gauge, also known as an air gauge or master gauge, is a tool used for measuring and adjusting the air pressure in tires. Proper management of tire pressure is crucial for vehicle safety. Although many drivers might not regularly monitor their tire pressure, it’s important to check and adjust it regularly to maintain optimal vehicle performance

Necessity of Tire Pressure Management

Managing tire pressure is essential to prevent traffic accidents. Low tire pressure can lead to the standing wave phenomenon. If a vehicle continues to drive under this condition, the tires may overheat and potentially burst. Additionally, low tire pressure increases driving resistance, makes steering more difficult, and negatively impacts fuel consumption.

Types of Tire Pressure Gauges

Tire pressure gauges are broadly classified into dial, bar-shaped gauge, and digital display types. Their prices vary based on the accuracy of air pressure measurement. While affordable gauges, including many Chinese-made options, are available, it’s crucial to consider battery life and gasket quality when making a selection.

Uses of Tire Pressure Gauges

Tire pressure gauges are primarily used for measuring tire air pressure. If the pressure is found to be low, it must be refilled with air or nitrogen gas, typically using an air compressor at a gas station. Portable compressors available at car accessory stores offer a convenient home solution. However, be mindful of noise levels and consider the time and surroundings when using these devices.

  • Supplementary information on the use of tire pressure gauges
    Recently, small compressors that can be easily filled with air at home are sold at car accessory stores. They are surprisingly affordable, starting at around 15 dollars, and available on the Internet. They can be used in any car since power is supplied from a 12 V cigar power source. However, since the operation noise is somewhat loud, it is necessary to be considerate of the time of day and neighbors when using the device.
  • Precautions when using tire pressure gauges
    Generally, tire pressure is measured when the tire itself is completely cold. Since there is a considerable difference in temperature between mid-summer and mid-winter, even if the air pressure is set at the correct pressure in mid-summer, it will often become incorrect in mid-winter. When the temperature and road surface temperature drop, it is recommended that the air pressure be measured once before winter using a tire pressure gauge. Measuring air pressure in the heat of summer is not only affected by the outside temperature but also by the heat received from the asphalt, which is considerably heated under the scorching sun. In mid-summer, the asphalt in the hot sun is so hot that it burns to the touch. Under these conditions, it becomes difficult to adjust tire pressure properly. It is also recommended to check tire pressure about once every two months.
  • Tips for adjusting tire pressure
    Tire tread wear varies slightly depending on air pressure. For example, if the tire pressure is set too high, the center of the tire tread will wear more easily. Conversely, if the tire pressure is set too low, both ends of the tire tread will wear more easily. By carefully observing the wear condition of the tire and adjusting the tire pressure to use the tire in a well-balanced manner, the tire can be made to last longer. 

Principle of Tire Pressure Gauges

The main method of measuring air pressure with tire pressure gauges is to use a piston as the internal structure. When the tire pressure gauges are connected to the air valve of the tire, the piston integrated with the spring inside the tire pressure gauges is pushed out by the air pressure from inside the tire. This moves the inside of the tire pressure gauge, converting its position into an air pressure display based on the amount of movement. The meter displays the value in a readable manner.

The simple rod-shaped tire pressure gauges also have the piston structure described above, and the position of the piston can be displayed on the gauge as it is, and the air pressure can be measured by reading the scale. This makes the structure relatively simple. The dial display type with a built-in piston has a structure that allows the air pressure indication to be read by converting the piston’s movement into its position on a rotary meter. Both display types have an internal stopper that stores the highest measured value so that it can be read.

The dial type also includes the Bourdon tube type. The Bourdon tube type has an oval-shaped metal pipe in the internal structure of the tire pressure gauges, which deforms according to air pressure to measure the air pressure inside the tire and display it on the meter of the tire pressure gauges. As a rule, the Bourdon tube type tends to have higher measurement accuracy than the piston type.

Accuracy of Tire Pressure Gauges

First of all, for tire pressure gauges to accurately measure the air pressure, it is necessary to check the condition of the tire itself.

Tires that have been driven heavily have the characteristic of displaying a higher tire pressure because of the heat and expansion of the air inside the tire. Therefore, the tire pressure immediately after driving may not be accurately displayed in the tire pressure measurement. To accurately measure tire pressure, it is important to move the vehicle indoors on unheated asphalt or concrete and allow the tires to cool sufficiently before measuring the tire pressure.

The accuracy of tire pressure gauges varies from product to product, depending on the price range and internal construction.

The lower-priced tire pressure gauges will have a larger error in air pressure, which can be negligible for some serious competition vehicles. Inch-up tires and tires with low flatness tend to pull tires, so any error in air pressure is dangerous because it can lead to bursts while driving.

If you require accuracy in tire pressure gauges for your use, choose tire pressure gauges that are appropriate for the price. If necessary, use a tire pressure gauge that is more accurate.

If you are driving mainly in town, and not at high speeds, you do not need to pay much attention to the error of tire pressure gauges, but please be aware that tire pressure gauges have various errors depending on the product.

Calibration of Tire Pressure Gauges

If tire pressure gauges are used for a long period, errors will gradually occur, and if left unchecked, the errors will become larger and larger, so regular “calibration” is necessary to prevent this.

The most accurate way to perform “calibration” is to borrow calibration equipment from tire manufacturers and perform calibration.

The air hose from the compressor is connected to the main unit of the calibrator, and the air pressure is adjusted to a constant value. Next, connect the tire pressure gauges to the valve of the calibrator, and check if the tire pressure gauges show the same value as that of the calibrator. If there is an error, adjust the tire pressure gauges so that the value on the tire pressure gauges side is the same as the value on the calibrator side. Repeat this process until the values become the same, and “calibration” is completed.

カテゴリー
category_usa

Swaging Tool

What Is a Swaging Tool?

Swaging ToolsOriginally, ‘crimping’ described a method of joining metal plates through deformation, and the term extends to wire and terminal connections. For connecting a terminal to an electric wire, a special crimping tool crushes the terminal for a firm wire connection, widely used in electrical wiring.

Using a swaging tool eliminates the need for solder, requiring only wire end treatment, thus simplifying the process.

Uses of Swaging Tools

Swaging tools are employed for crimping connections between wires and terminals, as well as for fastening various fasteners. Different terminal types demand specific crimping tools, and using an unsuitable tool can result in inadequate crimping and terminal loosening.

Principle of Swaging Tools

To crimp a terminal on a wire using swaging tools, the wire’s coating must first be stripped, often using a wire stripper tool. Some swaging tools integrate wire stripper and cutter functions.

After stripping, the metal wire, when directly connected to the terminal, enables electricity flow. The tool is set and then gripped to crimp the wire. Once swaging tools are gripped, the action is irreversible, and any failure requires restarting the process.

Swaging Tools, Also Known as Crimping Tools

Swaging tools, commonly referred to as ‘crimping tools’ or simply ‘crimp,’ require specific tools for various swaging tasks. They crimp diverse items like “crimp terminals,” “rivets,” and “ring sleeves.” Each size and type of terminal or rivet needs a dedicated tool, though some multifunctional tools can handle multiple sizes.

One Dollar Crimping Tool

A budget-friendly ‘swaging tool,’ or ‘snap punch,’ for “snap buttons” is available. Professional electricians in the field might use such cost-effective tools. Tools for crimped terminals and rivets are available in specialized stores and online, though the inability to physically test the tools online is a drawback.

Substitutes for Swaging Tools

If swaging tools are unavailable, substitutes like radio pliers or pliers may be considered, although not recommended. These might suffice for crimping, but they may lack the desired functionality or aesthetic. Improperly crimped rivets risk detachment at critical moments.

Crimping Rivets With Swaging Tools

Rivets, resembling nails, require swaging tools for proper installation. Pulling the nail-shaped part with the tool crushes the rivet’s end, allowing the caulking of multiple pieces. This operation is nearly impossible without a dedicated tool. Rivets, also known as “blind rivets,” “solid rivets,” or “flat rivets,” each demand a specific caulking tool.

カテゴリー
category_usa

Combination Plier

What Is a Combination Plier?

Combination Pliers

Combination pliers are versatile tools used across various fields, from DIY projects to general work. Specialized for gripping and pinching, they enable the handling of objects without soiling hands and safely grip hot or sharp items. A range of types, from budget-friendly to high-end models, are available, allowing selection based on personal preference and hand fit.

Uses of Combination Pliers

With adjustable gripping parts, combination pliers can securely handle both small and large objects. They are extensively used for heavy-duty tasks such as industrial product assembly and maintenance, as well as for personal DIY carpentry.

Common applications include handling objects with oil or grease and gripping red-hot steel plates. Additionally, pliers with teeth at the intersection can cut, bend, and twist metal wires in a single operation, aiding in binding and securing industrial products.

Principle of Combination Pliers

A key feature of combination pliers is their two-stage motion range, adjustable by opening the pliers wide and switching the fulcrum position. This versatility allows for various tasks without needing to switch tools.

Leverage principles enable secure gripping with minimal force. The tool’s tip, or ‘jaw,’ has a sharp groove for pulling, turning, or prying objects while gripping them.

Compared to fixed-fulcrum pliers or nose pliers, combination pliers may be more prone to rattling at the crossed part. Regular maintenance is advised, especially to prevent excessive or improper use. Additionally, for pliers with a coated gripping area, the coating may wear off if exposed to oil or grease.