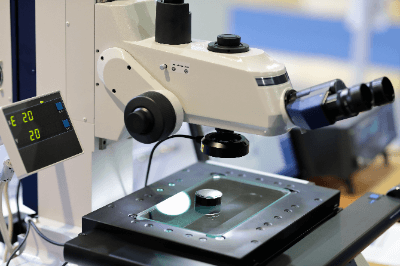
What Is a Measuring Microscope?

A measuring microscope is a dimensional measuring instrument that measures dimensions from images magnified by a microscope.
A measuring microscope is a combination of an optical microscope magnified at precise magnification. It also serves as template for comparative measurement, and an XY stage for precise movement of the workpiece on a plane. Measuring microscopes enable non-contact measurement, allows observation of contours and surfaces without damaging the workpiece.
Measuring microscopes generally use telecentric optics in their optical system. In recent years, there are specifications that employ an infinity-corrected optical system in the optical head to enable differential interference observation and simple polarized light observation.
Uses of Measuring Microscopes
Measuring microscopes are used for production and quality control of relatively small mechanical parts, electronic device parts, and semiconductor products. These measuring microscopes are suitable for the measurement of small parts and fine areas that are difficult to measure without microscope magnification.
In addition to dimensional measurement, the microscope can also be used for observation using polarized light and differential interference, for example, to detect flaws in semiconductor substrates. Due to the accuracy of its magnification, it is also useful for simple inspections to determine if a product is within tolerance by performing comparative measurements using a template.
Measuring microscopes can be used as both a measuring instrument and a microscope. Meanwhile, a single unit of measuring microscope can be used for a variety of purposes.
Principle of Measuring Microscope
Measuring microscopes can be classified according to the illumination method.
1. Transillumination
Transillumination is used for dimensional measurement by transmitting light and capturing the shadow of an object as a contour shape. It is used to measure contours.
2. Vertically Reflected Illumination
Vertically reflected illumination shines light perpendicular to the surface of an object and observes the surface through the reflected light. Vertical reflected illumination can be used not only for dimensional measurement but also for observation of surface shape.
3. Oblique Reflection Illumination
Oblique reflection illumination is an illumination method that illuminates light at an angle to the surface of the object to be measured. The feature of this method is that the contrast of the image is emphasized, resulting in a three-dimensional and sharp image. However, it is more likely to cause errors in dimensional measurement.
Other Information on Measuring Microscope
1. Telecentric Optics
Most measuring microscopes use telecentric optics for transillumination. Microscopes that do not use telecentric optics will make objects close at hand appear larger and objects farther away appear smaller.
This phenomenon is the same with cameras that we use in our daily lives. However, in dimensional measurement, this characteristic results in distant objects being measured smaller in relation to different parts in the height direction.
With a lens using telecentric optics, the image is blurred, but the size remains the same, even if the focus is shifted in the direction of the distance to the lens and the optical axis. Telecentric optics are indispensable for measuring microscopes, where dimensions are measured while observing with the microscope.
2. Parallelization of Measuring Microscope
Measuring microscopes are used to measure by placing the object to be measured on the XY stage. Therefore, the measurement point can be anywhere within the operating range of the XY stage. In other words, no matter where the object to be measured is located on the XY stage, the XY stage can be moved to the measurement point.
Some angles or circle diameters to be measured may require a large movement of the XY stage, but the contour of the measurement object is never placed parallel to the movement of the XY stage without special adjustment. Therefore, it is necessary to make the movement of the XY stage and the reference edge of the measurement object parallel before measurement.
If the measurement object and the XY stage are not parallelized, large errors will occur when measuring angles and parallelism. Therefore, calculations are required to compensate for the measurement results. In recent years, manufacturers have a lineup of measurement devices that create a coordinate system on the XY stage and calculate from the coordinates of the origin and measurement points. By using these devices, the man-hours required for parallelization can be reduced.
3. Field of View of Measuring Microscope
While it is important for a microscope to be able to observe an object under large magnification, it is also important to be able to obtain a wide field of view at a time. The field of view is the area that can be observed at one time using a microscope. The field of view is determined by the diameter of the eyepiece.
The size of the field of view is called the number of fields of view, and the actual field of view represents how much of the surface of the object being measured is visible within the field of view.
The relationship between the actual field of view and lens magnification is as follows:
Actual field of view = Number of fields of view of eyepiece / Magnification of objective lens
As can be seen from the above formula, if the number of fields of view of the eyepiece is the same, the range of the actual field of view becomes narrower as the magnification of the objective lens becomes larger. This indicates that there is a trade-off between increasing the magnification of the objective lens to magnify the object to be measured and the range that can be viewed at one time.
To increase the actual field of view, the diameter of the eyepiece must be increased or the magnification of the objective lens must be decreased. However, there is a limit to reducing the objective lens magnification because of the magnification required for measurement. For this reason, measuring microscopes are equipped with an XY stage and a counter that displays the amount of movement, as well as other devices to measure areas that do not fit into the field of view.